
Real estate photography isn’t just about taking pretty pictures of houses. It’s about selling a lifestyle, a feeling, a future. A well-shot listing can make a $400,000 home feel like a dream home. A poorly lit, cluttered photo can make a $600,000 home look like a project no one wants to touch. The difference? Real estate photography that works.
Why Real Estate Photography Matters More Than You Think
Over 90% of homebuyers start their search online. That means your listing photo is often the first-and sometimes only-impression a buyer gets before scrolling past. A study by the National Association of Realtors found that homes with professional photos sell 32% faster than those with amateur shots. And they often fetch higher prices, too.
It’s not magic. It’s technique. Buyers don’t just look at square footage. They look at light, space, and flow. A photo that makes a tiny living room feel open, or a dark kitchen feel warm and inviting, changes how people perceive value. That’s why real estate agents who invest in good photography get more showings, faster offers, and fewer price drops.
What Makes a Real Estate Photo Work?
Good real estate photography follows three simple rules: show space, highlight features, and remove distractions.
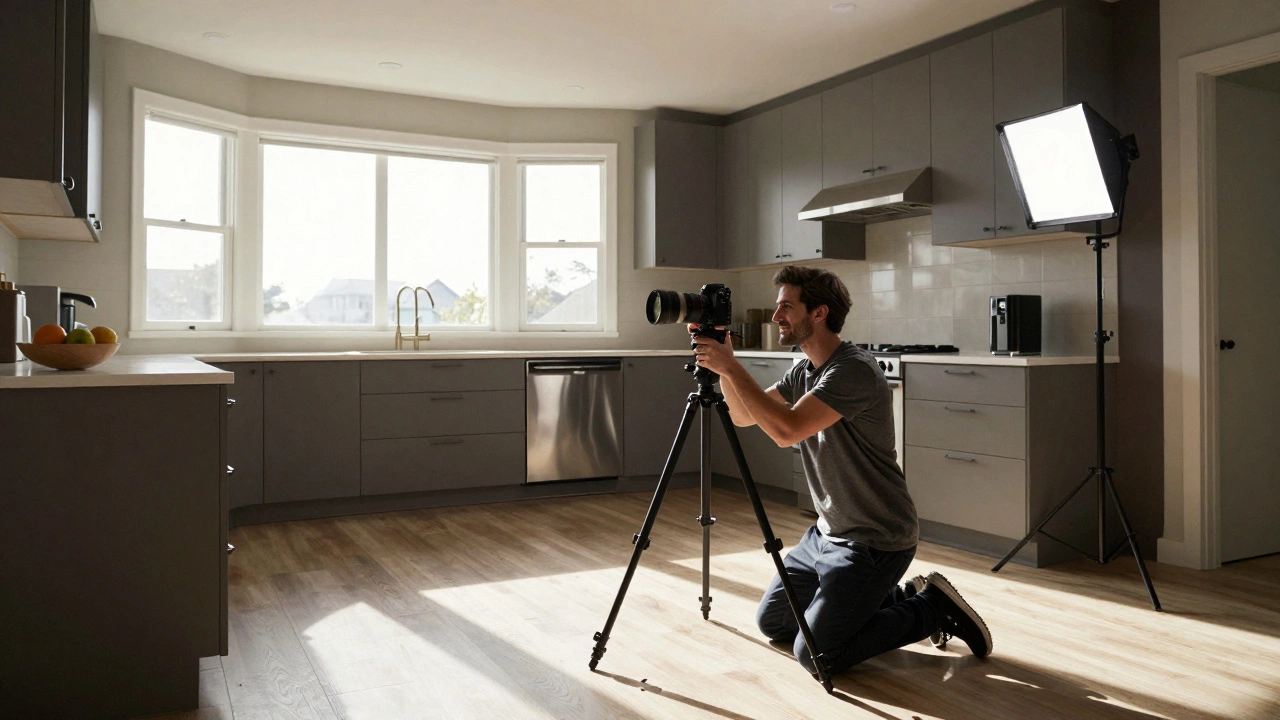
Start with wide-angle lenses. Most agents use 10-14mm lenses on full-frame cameras. That’s wide enough to show the whole room without making walls look curved or distorted. But don’t go too wide. A 7mm lens makes a 12-foot ceiling look like a cathedral-and makes buyers wonder if the house is a haunted mansion.
Lighting is everything. Shoot during the day, when natural light pours in. Open all blinds, turn on every lamp, and use off-camera flashes to fill shadows. Don’t rely on the camera’s auto mode. Set your white balance to “cloudy” or “shade” to warm up cool indoor light. A 5600K Kelvin setting often looks too blue for interiors.
Staging matters more than you think. Even if the house is empty, remove clutter. Take out personal items: family photos, toothbrushes, kids’ toys. A clean space lets buyers imagine themselves living there. A few well-placed throw pillows, a vase with fresh flowers, and a coffee cup on the counter can make a huge difference.
Essential Gear for Real Estate Photography
You don’t need a $5,000 setup. But you do need the right tools.
- Camera: A full-frame DSLR or mirrorless camera (like Canon EOS R6, Sony A7 IV) gives you better low-light performance and dynamic range. Crop-sensor cameras work too, but you’ll need to shoot more exposures for HDR.
- Lens: A 10-22mm or 14-24mm wide-angle lens is standard. Avoid zooming in too much-you need to capture the whole room in one shot.
- Tripod: Non-negotiable. Even the best camera shakes at slow shutter speeds. A sturdy tripod lets you use low ISO and long exposures without blur.
- Remote shutter: Helps avoid camera shake when pressing the button. Use your phone app if your camera supports it.
- Flash or LED panels: For filling dark corners. A small, portable LED panel like the Aputure Amaran COB 60d works well. Avoid on-camera flash-it creates harsh shadows and makes walls look washed out.
- Drone (optional): For homes with large yards, pools, or mountain views. A DJI Mini 4 Pro is enough for most listings. Don’t fly over neighbors’ property without permission.
How to Shoot a Listing: Step-by-Step
- Prepare the space: Clean everything. Dust blinds, wipe mirrors, vacuum floors. Remove trash cans, pet bowls, and clutter. Open curtains and blinds. Turn on all lights.
- Set your camera: Use manual mode. Set aperture to f/8 for sharpness across the room. Set ISO to 100 or 200 to avoid noise. Use shutter speed between 1/15s and 1/2s. If it’s too dark, use a flash or bracket exposures.
- Shoot each room: Start with the front of the house. Then move to the living room, kitchen, master bedroom, and bathroom. Shoot from the corner of the room, angled toward the main feature (e.g., fireplace, window, island).
- Use HDR if needed: If the windows are too bright and the room too dark, take three shots: one exposed for the highlights, one for the midtones, one for the shadows. Merge them in Lightroom or Photoshop. Don’t overdo it-HDR should look natural, not like a cartoon.
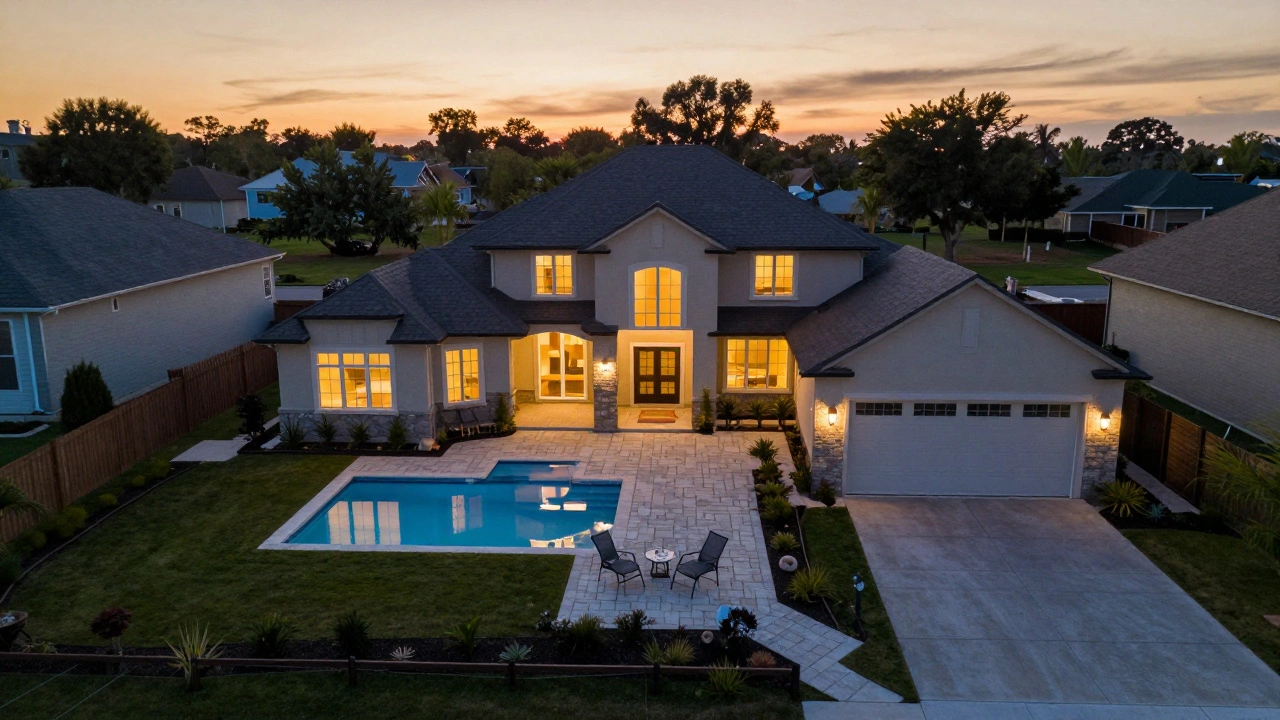
- Shoot the exterior: Shoot the front of the house during golden hour (sunrise or sunset). Avoid midday sun-it flattens textures and creates harsh shadows. Show the driveway, porch, and landscaping.
- Shoot the backyard: If there’s a pool, patio, or garden, capture it. Include people-sized elements like chairs or a grill to show scale.
Common Mistakes to Avoid
Even experienced photographers make these errors:
- Shooting with the sun behind you: That makes windows look like white holes. Always shoot perpendicular to windows, not into them.
- Leaving dirty dishes in the sink: Buyers notice. Always clean the kitchen before shooting.
- Using fisheye lenses: They distort walls and make rooms look like funhouses. Stick to rectilinear wide-angle lenses.
- Forgetting the closet: Buyers check closets. Shoot them open with clothes neatly hung. Empty closets look smaller.
- Editing too much: Don’t make ceilings look blue or floors look glossy. Keep colors realistic. Buyers will walk in and expect what they saw online.
Post-Processing: Less Is More
Editing is where many real estate photos go wrong. You’re not creating art-you’re showing truth.
Use Lightroom or Capture One. Adjust exposure, contrast, and white balance. Remove dust spots and minor blemishes. Don’t add fake sunlight or blur out neighbors’ houses. Don’t stretch walls to make rooms look bigger. That’s misleading-and it leads to complaints, bad reviews, and lost deals.
Export at 1920x1080 pixels. Most MLS systems resize images anyway. Don’t waste time with 4K files. Use JPEG at 90% quality. File size should be under 5MB per image.
What Buyers Really Notice
When you look at a real estate photo, you don’t think about aperture or shutter speed. You think:
- Is this clean?
- Is this bright?
- Does it feel like a home?
- Would I want to live here?
That’s what matters. A photo that answers those questions with a yes gets clicks. A photo that answers with a maybe or no gets scrolled past.
One agent in Austin told me her listing with professional photos got 87 showings in two weeks. The same house, shot by a friend with an iPhone, got 12. The price was the same. The location was the same. The only difference? The photos.
When to Hire a Pro
You can learn to shoot real estate photos yourself. But if you’re selling a luxury home, a high-end condo, or a property in a competitive market, hire a pro. Professional real estate photographers charge $150-$400 per listing, depending on size and location. That’s less than 1% of the sale price-and often pays for itself in faster sales and higher offers.
Look for photographers with a portfolio that shows consistency: clean lighting, accurate colors, no distortion. Ask if they use HDR and how they handle outdoor shots. Check reviews. A good photographer doesn’t just take pictures-they help you sell.
And if you’re a real estate agent? Make professional photography part of your standard service. Don’t wait for clients to ask. Include it in your listing package. It’s not an expense. It’s an investment.
What camera settings should I use for real estate photography?
Use manual mode: aperture f/8, ISO 100-200, shutter speed between 1/15s and 1/2s. Use a tripod. Set white balance to cloudy or shade for warmer indoor light. Shoot in RAW for better editing control.
Do I need a drone for real estate photography?
Not always. But if the property has a large yard, pool, lake view, or hillside location, a drone adds value. Use a DJI Mini 4 Pro or similar lightweight model. Always check local laws-some neighborhoods restrict drone use.
How do I make a small room look bigger in photos?
Use a wide-angle lens (10-14mm), shoot from the corner of the room, and keep it clean and uncluttered. Open curtains, turn on lights, and remove bulky furniture. Avoid shooting from the center of the room-it makes walls feel closer.
Should I edit photos to make them look brighter?
Yes, but only slightly. Adjust exposure and contrast to match the real lighting. Don’t make windows look like white voids or walls look unnaturally blue. Buyers will visit the house and expect what they saw online.
Can I use my smartphone for real estate photography?
You can, but it’s risky. Smartphones struggle with low light and dynamic range. They also don’t let you control depth of field or exposure as precisely. For listings in competitive markets, professional gear gives you an edge.
Next Steps: Start Shooting Today
Don’t wait for the perfect camera or the perfect day. Grab your phone, open the blinds, and take a photo of your living room right now. Compare it to a photo you’ve seen online. What’s missing? Light? Space? Clarity?
Real estate photography isn’t about being a genius. It’s about being consistent. Clean the space. Shoot in daylight. Use a tripod. Edit lightly. Repeat.
The best real estate photos don’t shout. They whisper: you belong here.
14 Responses
Just shot my first listing this week with a Canon R6 and 14-24mm. Made a huge difference. Client got three offers in five days. No magic, just good light and clean space.
Also, never use auto white balance. Always set it to cloudy. It’s the little things.
Oh wow. So you’re telling me that if I just turn on the lights and stop letting my cat nap in the middle of the living room, my $750k house will magically sell faster? Groundbreaking. I’ll add ‘remove pet hair’ to my to-do list next to ‘stop wearing pajamas to open houses.’
Drone? Useless. Real estate isn’t about aerial views. It’s about selling America. If you’re shooting a house in Texas and you don’t show the front porch with the American flag, you’re doing it wrong.
Had a client in Vancouver last month. House had a killer mountain view. Shot it at golden hour with a DJI Mini 4 Pro. Got 112 views in 48 hours. Canadians don’t need flashlights-they need perspective. Also, don’t forget to remove the ski racks. Looks like you’re trying to escape.
So let me get this straight. You want me to spend $300 on a pro photographer so I can make my 800 sq ft studio look like a mansion? Cool. I’ll just hang a ‘For Sale’ sign on my toaster and call it a day.
May I respectfully suggest that the discipline of real estate photography reflects the broader virtues of order, clarity, and dignity in human habitation? A well-composed image is not merely a technical exercise-it is an act of honoring the sanctity of domestic space. One must approach each frame with reverence.
I hired a photographer who used a tripod. Can you believe it? A TRIPOD. Like I’m in a museum, not a living room. And then he edited the curtains to look ‘more inviting.’ I swear, if I see one more photo where the sofa looks like it was lifted from Architectural Digest, I’m moving to a cave.
pro photographers are a scam. all you need is your phone and a flashlight. the market is rigged. they want you to buy gear so they can profit. trust me i know. i saw a video on tiktok
Just take a picture. Clean it up. Show the light. No need to overthink it. People want to feel at home. Not get a photography lesson.
Oh so the secret to selling homes is… not leaving dirty socks on the floor? I’m shocked. Next you’ll tell me water is wet and gravity exists.
There’s something poetic about how a well-lit kitchen can make a stranger feel like they’ve already poured their first cup of coffee there. It’s not about megapixels-it’s about the quiet promise of belonging. I’ve seen homes sell because the photo made someone believe they could be happy there. That’s the real magic.
One might argue, with considerable philosophical rigor, that the act of photographing a dwelling is not merely a technical or commercial endeavor, but an ontological intervention: the photographer, by selecting angles, light, and composition, is not documenting space-but constructing a narrative of possibility, a mediated dream of domesticity, wherein the viewer is invited-however subtly-to perform the role of future inhabitant. Thus, the lens becomes a mirror of aspiration, not merely a recorder of square footage.
Wow. You’re all so naive. The real reason homes sell faster with professional photos? Because the agent paid the buyer’s agent to push it. The photos are just the cover. Also, your ‘clean space’? That’s just staging. You’re lying to people. And you call it art?
Just want to say thanks for the detailed breakdown. I’m a new agent and this helped me realize I’ve been cutting corners. I’m booking a pro for my next listing. Worth every penny. Also-removed the cat’s bed from the living room shot. Big difference.